Showing posts with label Azure. Show all posts

Sunday, 14 February 2021

Regional Settings in Azure App Services

Thought I should share something we've come across this week while testing our API on Azure...

I was testing some reporting functions where we put in To and From dates, and I entered 01/01/2021 and 31/01/2021 - and I got an exception. Looking it up in AppInsights, it was an InvalidFormatException coming from DateTimeOffset.Parse. I checked the same dates on our production site (currently hosted on-prem) and it was fine. So what's the issue?

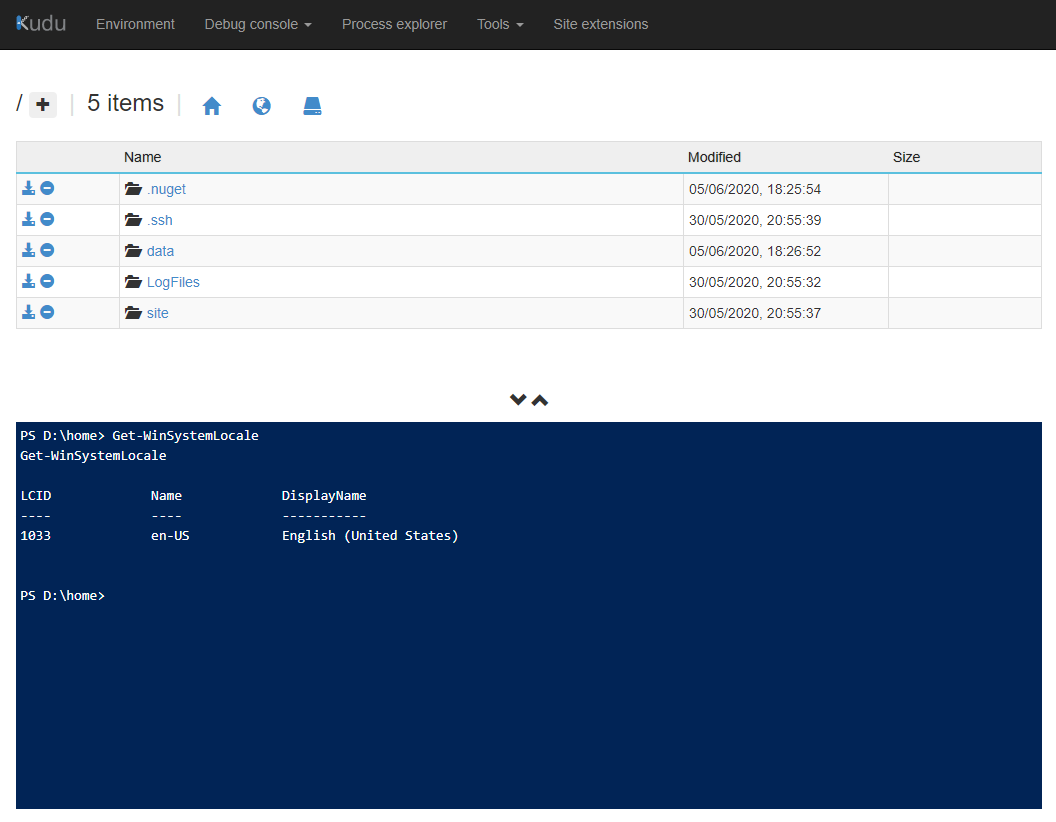
Well, it turns out that for an App Service instance, the regional settings (all those currency symbols and, most relevantly here, date formats) are set to US English, and trying to parse 31 as a month doesn't work. You can demonstrate this for yourself if you go to an App Service instance and then go to the Kudu debug console - in Powershell the command Get-WinSystemLocale will show you what your current region settings are set to. Here's a screenshot from one of mine which is located in the UK West Azure region:

Kudu console showing regional settings for an AppService instance

So how do you fix it? There is a counterpart Set-WinSystemLocale Powershell command, which you might be tempted to try, but it won't work as you need to be an administrator on the computer, which you aren't...

If you are using the .NET framework, there is a relatively simple fix: in your web.config in the system.web element, add a new globalization element:

<system.web>

    <globalization culture="en-GB"/>

</system.web>

(Or replace the region code with the one relevant to you - there's a good list of codes here). And then your API will parse dates correctly.

In .NET Core/.NET 5, you can set the CultureInfo for the current thread in the Configure method of your Startup class as laid out in this SO answer.

You can add an application setting to your app (WEBSITE_TIME_ZONE/TZ depending on whether you are using a Windows host or a Linux host) that manages which timezone it will use, and it would be neat if there was an equivalent that allowed to specify what regional settings you want to use.

Saturday, 30 January 2021

AZ-204 Study Materials

 I took - and passed :-) - the AZ-204 Developing Solutions for Azure exam yesterday. 


Study materials I used were:

  • The MS learning paths listed on the exam page
  • The Pluralsight exam prep path
    • In particular I found the Exam Alert sessions really useful, and also even though I've been doing MS exams on and off for 20 years, I found Matt Kruzcek's session on Preparing To Take The AZ-204 exam really useful the night before as a refresher on what to expect on the day, and usefully on the question types used on the exam
  • Before Xmas through work we had an invite to a Microsoft exam preparation session which walked through each entry in the list of skills measured in the exam; I picked up some really useful bits from this session so if you can get on one of them I'd recommend it


What Next?

I'm now debating what to study for next - I want to do the Azure Solutions Architect certification, but also (now that I've unlocked it) the DevOps Engineer Expert certification is likely to be both useful and relevant for work. So I'm not sure which one to work on...

Saturday, 25 July 2020

Controlling Your Costs With Azure Policy

I made a mistake. I've been trying to figure something out in Azure, and I needed a website to do it with, so I spun one up on a new App Service Plan. I missed that the default plan is a premium plan, and I only noticed this the other day. In the meantime, my site has been racking up charges, and as a result my Azure bill for July is going to be ... about £100. 

Which is (kind of) fine, experience is the best teacher, it's my mistake and I'm going to own it. It's not a problem-causing amount of money for me. And I'm not averse to spending that kind of money on Azure services on purpose, it's just not the sort of thing I want to be doing again by accident.

Fortunately, I know by using Azure Policy that you can put all kinds of controls in Azure to stop people doing this sort of thing and ending up costing your company lots of money, so I've put the same kind of control in for myself.

What I need is a policy that stops me creating any more premium App Service Plans, and this is not that difficult to achieve.

Policies work on an 'if-then' model, you give the 'if' clause a set of conditions and if the set of conditions matches, then the 'then' clause fires. So in my case when I'm creating a new Azure resource my conditions will be: the resource type is an App Service Plan, and the SKU name is not set to 'F1', and my action will be to stop the action i.e. prevent the resource from being created.

Policies are written in JSON, you can write them directly in the Azure Portal, there is also a VSCode extension to help you with creating them. Here's a skeleton policy:

"policyRule": {
    "if": {
      }
    },
    "then": {
      "effect": ""
    }
  }

Effects can be any of a number of values, including "deny" which disallows the action completely, "audit" which allows the action but logs that your policy is being violated, and a number of others including some that will change your action to make it comply with your policy.

So clearly the effect in my then clause needs to be "deny", so that it correctly prevents the action. Which leaves me to work out what the correct if clause is. As I said above, I have two conditions, so I'll be using the allof condition which translates to an AND operator (there is also anyof which is the equivalent of OR). My first condition is that I want the policy to act on App Service Plans, so I'll need to be looking at the type of thing that's being created. Policies use a system of aliases for types (with namespaces), there are two ways to find the alias you want. The hard(er) way is to use the Azure command-line tool to query a list of available aliases as suggested in the documentation e.g.

az provider show --namespace Microsoft.Web --expand "resourceTypes/aliases" --query "resourceTypes[].aliases[].name"

The easy way is to go through the resource creation process in the Azure portal, through to the 'Review and Create' step. Once there, don't create the resource, but download the ARM template, and then search through it for the 'resources' element; inside the resources element, look for a 'type' property, and the value of the property is the alias you want. Which tells me that for an App Service Plan, the alias I should be using is 'Microsoft.Web/serverfarms'. On to the SKU value! I need to look at a property of a serverfarms object and check whether or not the value is 'F1' (the name of the free tier). And if we go back to the command-line query and browse the results, we can see that under Microsoft.Web/serverfarms there is a sku.name property; we can use that with a 'notEquals' operator to check the value.

So our whole policy looks like this:

"policyRule": {
      "if": {
        "allof": [
          {
            "field": "type",
            "equals": "Microsoft.Web/serverfarms"
          },
          {
            "field": "Microsoft.Web/serverfarms/sku.name",
            "notEquals": "F1"
          }
        ]
      },
      "then": {
        "effect": "deny"
      }
    }

I applied this policy to my subscription, and here's what happens if I now try to create a premium service plan.

Note that the policy evaluation happens in the review stage, before the resource is created.

We've looked here at creating a basic (but useful!) Azure policy to restrict creation of a premium Azure resource, and you can apply that to your own subscriptions to help keep you from making the same mistake I did. And this is only a taste of what you can achieve with Azure Policy.

(And now I'm protected from accidentally creating any more premium App Service Plans - but I could create a premium database, or a storage account, or a VM... Hmm, maybe I need to go write some more policies...)

Thursday, 23 April 2020

Reading and Writing Azure KeyVault Secrets with C#

Every application has secrets of one kind or another; database connection strings, API keys or other credentials are all common examples and you can probably think of others without having to try too hard. So every application needs to be able to store, read, update and remove secrets. 

Azure KeyVault is the Azure store for securely storing and accessing secrets, in this blog I'm going to go through how to setup a C# application to get your secrets in and out of KeyVault.

So I've set up a KeyVault through the Azure portal, and I've added a secret to it.


The next thing we need to do is set up a principal in Azure Active Directory; this will give our application a context by which it will be able to access the KeyVault. This can also be done through the Azure portal by entering 'Active Directory' in the top search bar. Once in the AD blade, you need to create a new app registration, so click on 'App Registrations' in the menu and then click 'New Registration'. You'll need to enter at a minimum a name for your registration, and you can optionally enter a URI that receives an authentication token. I'm not entering one here as my demo will just be a console application, but you might need one depending on your individual applications. Note that if you do enter a URI, it must be either secured by SSL e.g. https, or it must be a http://localhost address.

Once the registration is created, you'll see it in the portal. You can see the clientId here, which we'll need later.
We'll also need to create a secret that our application will use to prove its identity to AzureAD when we try to request an authentication token. (Think of the clientId and secret as being like a username/password combination). Click on Certificates and Secrets in the menu, and then click the New Client Secret button. Enter a description and how long the secret should be valid for, and create the new secret. Like the clientId, we'll need the secret later, so make a note of it now as you will not be able to view it later on.
With the App Registration setup, we now need to associate that with the KeyVault. Return to your KeyVault in the portal, and click Access Policies in the menu. To allow the app to access the KeyVault, click the Add Access Policy link. Here you can set the permissions that your app will have against your vault. There are a set of predefined templates you can use, or you can assign individual permissions. For now, I just want to read and write secrets, so in the Secret Permissions dropdown I'll just select Get/List/Set/Delete.
With the permissions selected, you need to associate them with the principal we created in Active Directory. Click Select Principal to open the blade. You'll see a whole set of standard principals, so the easiest way to find the correct principal is to enter the name in the search box.
Once you've selected the principal, click Add to close the blade. And then click Save to save your application's access policy.


With all that prep work done, we can go write some code!

In Visual Studio, start a new .NET Core Console app, and add the Nuget packages Microsoft.Azure.KeyVault and Microsoft.IdentityModel.Clients.ActiveDirectory to it. 

The KeyVaultClient class is what we'll use to perform operations against the vault; it has a number of different constructors depending on your scenario, the one I'm using takes an AuthenticationCallback delegate. 
KeyVaultClient vaultClient = new KeyVaultClient(new KeyVaultClient.AuthenticationCallback(Program.GetToken));


The GetToken method's signature must match what the delegate expects - three string parameters for authority, resource and scope, and, probably because I don't deal with delegates very often, this was the part of this I found the most confusing as I couldn't see where they were coming from. The answer is that they are filled in by the callback at runtime, you don't need to supply the values yourself at any point. This is also where the clientId and secret we created earlier come in. Here's a sample GetToken method.
private static async Task GetToken(string authority, string resource, string scope)
{
    ClientCredential credential = new ClientCredential(clientId, clientSecret);

    var context = new AuthenticationContext(authority, TokenCache.DefaultShared);

    var result = await context.AcquireTokenAsync(resource, credential);

    return result.AccessToken;

}


Once we have a KeyVaultClient instance, we can start to query our vault. Your goto methods are most likely to be GetSecretsAsync, GetSecretAsync and SetSecretAsync, but there's a whole raft of methods for managing keys, secrets and certificates. GetSecretAsync returns a SecretBundle, of which the most relevant property is the actual value of the secret. Calling SetSecretAsync will create a new version of a secret; this will include creating the secret if it doesn't already exist in your vault, and it will also create a new version even if you set it to the same value as it already holds (GetSecretAsync also has an overload that allows you to specify a version identifier). So putting it all together here's what our console app looks like.

class Program
{
    static string clientId = "myClientId";
    static string clientSecret = "myClientSecret";

    static async Task Main(string[] args)
    {
        KeyVaultClient vaultClient = new KeyVaultClient(new KeyVaultClient.AuthenticationCallback(Program.GetToken));

        string vaultAddress = "https://myVaultUrl";
        string secretName = "secret1";

        var secret = await vaultClient.GetSecretAsync(vaultAddress, secretName);

        Console.WriteLine($"Current secret value: {secret.Value}");

        Console.ReadLine();

    }
            
    private static async Task GetToken(string authority, string resource, string scope)
    {
        ClientCredential credential = new ClientCredential(clientId, clientSecret);

        var context = new AuthenticationContext(authority, TokenCache.DefaultShared);

        var result = await context.AcquireTokenAsync(resource, credential);

        return result.AccessToken;
    }

}
And if I refer back to my vault, you can see that the value of secret1 is indeed 'it's a secret'

So, in this blog we've seen how to create a console application that authenticates against Azure Active Directory and then reads and writes secrets to and from Azure KeyVault. 
I've created a Github repo at https://github.com/philpursglove/KeyVaultDemo with a complete solution for listing, creating, updating and deleting your KeyVault secrets.